.svg)
.svg)
Mastering Enhanced eCommerce Tracking: Boost Sales with Google Analytics Enhanced eCommerce
Set up Enhanced Ecommerce in Tag Manager for boosting sales with Google Analytics enhanced eCommerce tracking.

Going Beyond Standard Ecommerce Tracking with Enhanced Ecommerce
If you own an online store, it's important to track certain metrics to understand how well it's performing. Traditional ecommerce tracking measures basic metrics like the number of transactions and revenue generated. But what if you want to go beyond these basic metrics and obtain more in-depth insights into how customers interact with your online store?
That's where Enhanced Ecommerce comes in. Enhanced Ecommerce is an analytics feature that enables online stores to track more granular insights into customer behavior throughout the entire shopping experience.
With Enhanced Ecommerce, you can track product impressions, clicks, detail views, additions to cart, removals from cart, checkout behavior, and more. By tracking these stages of the customer journey more precisely than ever before possible, Enhanced Ecommerce can help you identify areas for improvement on your site and ultimately increase sales.
A Brief Overview of Tag Manager
Focusing on the eCommerce context, Shopify merchants might offer a range of promotions, including coupons, to enhance sales. To optimize these promotional strategies and truly understand their impact, it's essential to gather and analyze transaction data. This data provides insights into customer behavior and the efficacy of your promotion, enabling informed decision-making for future strategies.
A helpful tool in this process is Google's Universal Analytics, especially when it's integrated with your Shopify store. If you're using Universal Analytics in combination with Google Tag Manager (GTM), you can effectively manage all your website tracking codes in one place. GTM houses these multiple tags, which could range from Google Analytics to third-party sources like AdWords or Facebook Pixel, within a single container tag.
Beyond simplifying tag management, GTM offers various other benefits. For instance, it integrates seamlessly with Google Analytics' Enhanced Ecommerce functionalities, providing a robust tool for managing and analyzing your eCommerce data. With its user-friendly interface and comprehensive documentation, GTM allows even those without extensive technical knowledge to set up and manage complex tagging systems effortlessly.
Setting up Enhanced Ecommerce in Tag Manager
Are you ready to set up Enhanced Ecommerce tracking for your website? Great! Let's dive into the first step: creating a data layer.
Creating a data layer for Enhanced Ecommerce tracking
Integrating Enhanced Ecommerce tracking with Google Analytics requires the construction of a data layer, a JavaScript object that retains key information regarding user interactions on your website. This data is pivotal in facilitating the comprehensive tracking of product activities. The development of a data layer necessitates proficiency in JavaScript and HTML.
Alternatively, you may choose to utilize pre-existing plugins or extensions, which simplify the process by providing pre-configured code. The data layer should encapsulate critical information such as product IDs, prices, names, and quantities. It is crucial to ensure that significant user interactions are recorded in the data layer for accurate tracking and assessment of eCommerce performance.
Upon successful creation and implementation of the data layer, the subsequent step involves the activation of Enhanced Ecommerce in Google Analytics. This approach allows for tracking the shopping behavior of customers on your website, right from page views to the transaction ID generated after a purchase. Furthermore, this data can be used to create a detailed funnel analysis to identify areas for improvement, effectively set up event tags, and can also be leveraged for Google Ads to enhance your overall marketing strategy.
Enabling Enhanced Ecommerce in Google Analytics
To leverage the full potential of Enhanced Ecommerce with Tag Manager, you must first activate it within your Google Analytics account. Navigate to the Admin section of your account and proceed to View Settings, followed by Ecommerce Settings.
Here, you'll find options to "Enable Ecommerce" and "Enable Enhanced Ecommerce Reporting" – ensure both are toggled on. This activation facilitates Google Analytics' collection and presentation of pertinent eCommerce data, such as purchased items, generated revenue, and more.
Having successfully established your data layer and activated Enhanced Ecommerce in your Google Analytics account, the next logical progression involves implementing Basic Enhanced Tracking. This tool is instrumental in tracking product impressions and clicks while simultaneously providing comprehensive analytics on product detail views.
This comprehensive guide to Google Analytics empowers you to optimize your eCommerce system for your particular eCommerce platform, from promotion views to checkout behavior. You can refine your marketing strategy by focusing on key metrics like conversion rate and average order value, made accessible through the powerful combination of custom JavaScript and Google Analytics view.
Before finalizing the settings, consider using the preview mode to test the functionality and verify the accuracy of your eCommerce data to GA. This step is crucial to prevent potential discrepancies and ensure reliable data tracking, beneficial for many eCommerce businesses.
Basic Enhanced Ecommerce tracking
.jpg)
Once you have set up your data layer and enabled Enhanced Ecommerce in Tag Manager, you can start with the basic tracking of your products. This includes tracking product impressions, clicks, and detail views. Tracking these basic interactions can provide valuable insights into how users engage with your website and your products.
Tracking product impressions
The term "product impressions" denotes the frequency with which a product shows up on a webpage. By observing these impressions, it's feasible to determine which items garner the most views.
Implementing tracking for product impressions involves incorporating the "impressions" object within your data layer. This specific object should encapsulate an array that represents each individual product displayed on your page.
Subsequent to adding the "impressions" object into your data layer, an impression tag should be established within Tag Manager. This tag should be set to trigger upon page load. It needs to be configured to react to the "impressions" event and subsequently transmit this pertinent information to Google Analytics.
By harnessing the power of Google Analytics Enhanced Ecommerce tracking, the data sent to Google Analytics can provide invaluable insights. These can help you evaluate the efficacy of your promotion tactics, including strategies like using a coupon code.
Implementing an Enhanced Ecommerce plugin simplifies this process, ensuring that every pageview is accurately recorded and the data is properly organized. This tool can help you monitor key elements like the eCommerce transaction details and other vital aspects associated with the name or ID of products.
In a nutshell, integrating your Enhanced Ecommerce data and Google Analytics Ecommerce functionalities can drastically improve your understanding of your customers' behavior, empowering your business to drive superior results.
Tracking product clicks
Product clicks refer to the number of times users click on a product link or image. By tracking product clicks, you can see which products are getting the most attention from users. To track product clicks, you need to add an "actionField" object to each "product" object in your data layer.
The "actionField" object should contain a value for "list" that identifies where the user clicked on the product (e.g., search results or recommended products). Once you have added this information to your data layer, you can create a click tag in Tag Manager that fires when a user clicks on a product link or image.
Tracking product detail views
A product detail view is registered when a visitor delves deeper into the specific information of a particular product, such as scrutinizing product descriptions, technical details, or customer reviews.
Monitoring these detail views can offer insights into which products are attracting the most attention and user engagement. To enable tracking for product detail views, it's essential to incorporate a "productDetail" object into your data layer.
This particular object should encapsulate specifics about the exact product under scrutiny, like its name, ID, or category. After feeding this data into your data layer, a detail view tag can be constructed within Tag Manager, set to activate when a user explores more granular details about a particular item.
These fundamental interactions, however, are just the starting point of what Enhanced Ecommerce can offer your website. In forthcoming sections, we'll delve into more sophisticated engagement metrics like tracking the addition of products into a cart and finalizing purchases.
In essence, when the ecommerce data is sent to tools like Google Analytics, it can help identify areas for improvement, even if your website does not support certain functionalities. You just have to ensure that the ecommerce code is correctly implemented and that every pageview tag correctly transmits the relevant data to Google Analytics. This allows you to effectively monitor all ecommerce activities, down to the specifics like tax and shipping considerations.
Advanced Enhanced Ecommerce Tracking
Now that you've got the basics of enhanced ecommerce tracking in Tag Manager under your belt, it's time to dive deeper. One of the most important ecommerce events is when a user adds an item to their cart.
By tracking these events, you can see which products are popular and which ones are not. This allows you to optimize your website to increase conversions.
Tracking Product Add to Cart Events
To track product add to cart events in Tag Manager, you'll need to create a new trigger that fires when a user clicks on an "Add to Cart" button. You'll also need to set up a new tag that sends information about the product and its price, as well as any other relevant data (like quantity) back to Google Analytics.
Once this is set up, you can view reports in Google Analytics that show which products have been added to carts the most frequently and at what time of day. This information can be used for A/B testing or for optimizing your website's layout.
Tracking Checkout Steps and Purchases
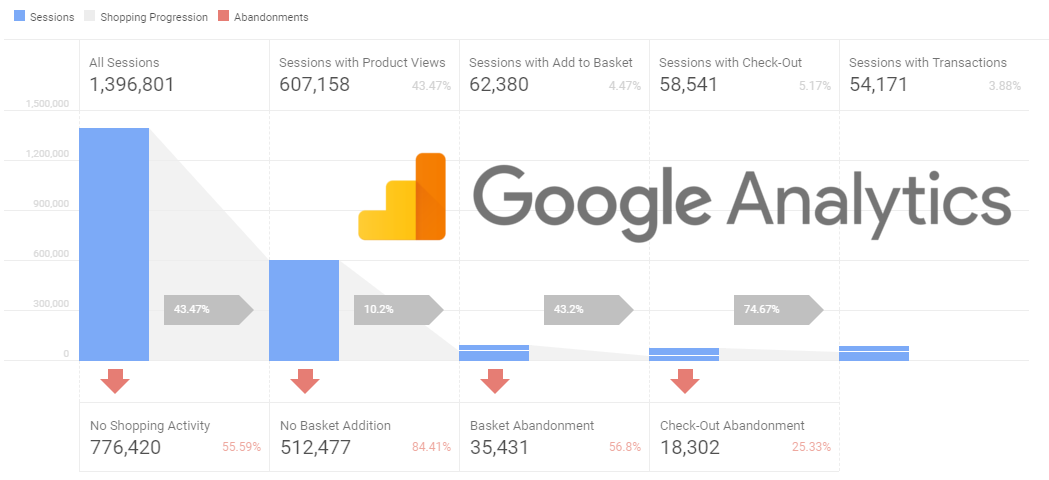
The next step in advanced enhanced ecommerce tracking is tracking checkout steps and purchases. By doing this, you'll be able to see where users drop off during the checkout process and identify any areas that might be causing issues (such as long forms or unclear instructions). To track checkout steps, create a trigger for each step (such as "Billing Information" or "Shipping Information") and then set up tags that send data back to Google Analytics when each step is completed by the user.
Similarly, tracking purchases involves setting up a new tag that sends information about the completed transaction back to Google Analytics (such as order ID, total cost, and items purchased). With this data at your fingertips, you can optimize your website to increase conversions and improve the overall checkout experience for your customers.
Customizing Enhanced Ecommerce tracking for your website Creating custom dimensions and metrics One of the biggest advantages of using Google Tag Manager and Enhanced Ecommerce is the ability to create your own custom dimensions and metrics.
These allow you to track specific actions, behaviors, or attributes that may not be covered by the standard Enhanced Ecommerce setup. For example, you might want to track how often users add products to their cart after viewing a specific page or how many people abandon their cart after adding a certain number of items.
To create custom dimensions and metrics, you'll need to first define what you want to track. This might involve working with your marketing team or analytics experts to determine what data is relevant and valuable for your business.
Once you have a clear understanding of what you want to track, you can create these dimensions and metrics in Google Tag Manager. Implementing custom events
Another way to customize your Enhanced Ecommerce tracking is by implementing custom events. These are basically additional triggers that tell Google Analytics when a specific action or interaction has occurred.
For example, if you want to track when users sign up for your newsletter or watch a video on your site, you can create an event that captures that behavior. To implement custom events in Tag Manager, you'll need to set up new tags that fire based on certain conditions (like clicking a button or submitting a form).
You'll also need to define what data should be passed along with the event (such as the user's email address or which video they watched). Once everything is set up correctly, these custom events will show up in Google Analytics alongside all of your other tracking data.
Customizing Enhanced Ecommerce tracking can take some time and effort, but it's well worth it if it helps you gain deeper insights into how users interact with your website. By creating customized dimensions and metrics and implementing custom events, you can track exactly what matters most for your business goals and make data-driven decisions to improve your website's performance.
Troubleshooting Common Issues with Enhanced Ecommerce Tracking
Even when you have everything set up correctly, there can still be issues with Enhanced Ecommerce tracking. Here are some of the most common issues that you may encounter and how to fix them.
Debugging the Data Layer
The most common issue with Enhanced Ecommerce tracking is a problem with the data layer. The data layer is what sends information from your website to Google Analytics, so it’s essential that it’s working correctly.
If you’re having trouble tracking events, impressions, or any other data in Google Analytics, the first thing to check is your data layer. To debug your data layer, open up your website in a browser and use the developer tools to inspect the page.
Look for errors or warnings in the console that could be related to your data layer. If you don't find any errors but still suspect an issue with your data layer, try using a tool like Tag Assistant or Data Layer Inspector (both are Chrome extensions) to help you identify any problems.
Resolving Conflicts with Other Tags
Another common issue with Enhanced Ecommerce tracking is conflicts with other tags on your website. This can happen if other tags are interfering with the data layer or if they’re sending conflicting information to Google Analytics.
To resolve conflicts with other tags, start by identifying which tags are causing conflicts. You can do this by using a tag auditing tool like ObservePoint or Ghostery.
Once you’ve identified which tags are causing issues, work on eliminating them one by one until you find the culprit. If all else fails and you’re still having trouble resolving conflicts between tags, consider hiring a professional tag manager consultant who has experience working through complex tag implementations and can provide expert guidance for these types of scenarios.
Key Takeaways: Enhanced Ecommerce With Google Analytics
Congratulations! You've made it to the end of this introductory guide to Enhanced Ecommerce for Tag Manager. We hope that you now have a better understanding of how to implement and utilize Enhanced Ecommerce tracking on your website.
Recap of the benefits of using Enhanced Ecommerce with Tag Manager
Let's recap some of the benefits that Enhanced Ecommerce can bring to your business. With Enhanced Ecommerce, you can track every step of a user's journey on your website, from product impressions all the way through to purchases. This level of detail allows you to gain valuable insights into user behavior and how they interact with your products.
Additionally, implementing Enhanced Ecommerce through Tag Manager makes the process much easier. By centralizing all your tags in one place, you can streamline your tracking implementation process, saving you time and resources.
Encouragement to explore further customization options
If you're feeling confident with implementing basic and advanced tracking with Enhanced Ecommerce, we encourage you to explore even more customization options. By creating custom dimensions and metrics or implementing custom events unique to your business goals, you can gain even more specific insights into user behavior.
We also encourage continued learning and staying up-to-date with the latest updates in Google Analytics and Tag Manager. With these tools constantly evolving, there's always something new to learn that could benefit your business.
By utilizing Enhanced Ecommerce with Tag Manager, you have the potential to gain valuable insights into user behavior on your website that can help drive business decisions. We hope this guide has been helpful in getting started with implementing this powerful tool on your website!
latest

